Convey Technology
Cleanroom Inspection Tools
Offset Inspection - How it Works

A particle loosely bound to a surface may later be transferred to a sensitive area of a product or process, creating a defect or a reliability risk. This mechanism defines a class of particulate contaminates: bits of the surface that are easily removed. We turn this mechanism into an inspection technique. If a small piece of a surface is peeled off by moderate normal force then the piece is identified as a particulate contaminant.
Our basic approach is analogous to offset printing, where a supply of colored particles and the paper are offset or separated by a print roller with special surface properties. In offset printing, parts of the print roller surface a hydrophilic and parts are hydrophobic, so that only parts of the roller pick up and transfer colored particles. In offset inspection, the surface of the roller is also engineered for the specific task of gathering particles and presenting them to an inspection system.
The Roller for Offset Inspection

A roller can have many configurations. Here we show a manual applicator, which is a disposable sampler loaded onto a rotating core on a handle. The handle and sampler are convenient for a wide variety of configurations and services. The rotating core is on a double sealed cleanroom bearing.
The sampler is the heart of the technique. It is a thin flexible tube coated with a tough, zero-residue, removable pressure sensitive adhesive (PSA). The PSA is a proprietary urethane containing no silcones or plasticizers. A sampler can be repeatedly rolled and inspected, substantially reducing the inspection cost. Samplers are delivered in sealed container; these can also serve as archival containers for the used samplers.
Sampling Operation for Arbitrary Surfaces
Obtaining the right balance of adhesion to particles and lack of adhesion to particles and lack of adhesion to surfaces requires a combination of sampler surface chemistry, physical compliance, and normal application force. Since manual rolling of the sampler gives uncontrolled normal forces, the sampler and core are designed to supply most of the required application force, using the peel force of removing the sampler from the surface.
The surface chemistry of the sampler can be modified for different amounts of adhesive force. Most metal's surfaces will generate a somewhat lower peel force, and plastic surfaces can be significantly lower.
A release stripe without PSA is provided on the sampler. The sampler can be easily removed from a surface if the release stripe is contacting the surface.
The sampler may be physically distorted as it is rolled. Each time the sampler is scanned, these distortions are measured and applied to the detected particle coordinates.
The sampler functions to:
- Clean the surface being inspected
- Concentrate particles from a large inspected surface onto a small surface
- Provide alignment marks for determining particle coordinates
- Archive particles for subsequent analysis
-Provide a low optical scatter background
The Scanner - Mycroft 5

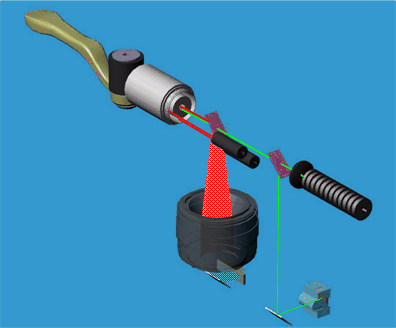
Even with a quality sampler, optically detecting sub-micron particles on the surface of pressure sensitive adhesive polymer requires care. The Mycroft 5 scanner, for example, uses high numerical aperture darkfield detection, and a small pixel size, along with a real time image processing engine and feature extraction.
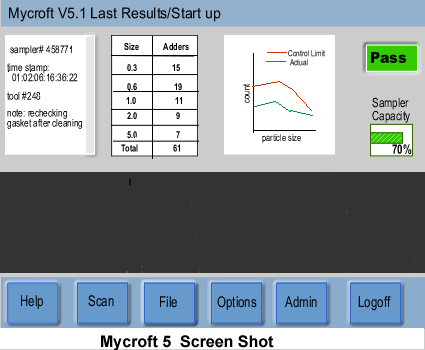
Each time the manual roller is put on the spindle of the Mycroft 5, the sampler is scanned and the serial number of the sampler is checked against previous stored scans. If the sampler has been scanned previously, a count and size histogram of the partricles added between the two most recent scans is displayed on the color touch screen.


For the Mycroft 5, count and histogram of particle adders between scans, as well as all of the particle coordinate data, is available for analysis using a standard USB 2.0 flash memory device.
Internal alignment and calibration of the Mycroft 5 scanner is divided into different diagnostic routines run every scan, during power-on self-test and in maintenance routines.
Since the detected particles are retained on the sampler, the scanner can provide a database of coordinates of particles on that sampler removed from a desired test surface at a specific timestamp. The database can direct other review and inspection techniques like Auger and SSEM.
The scanner functions to:
- Read serialization and alignment marks on the sampler
- Optically detect the particles on the sampler, storing their coordinates
- Determine the number of particle adders to a sampler between sequential scans
- Provide pass/fail and size histograms
- Output coordinate data for other instruments.
For additional specs for the scanner
click here